

The macSVG document window features a WebKit web view for drawing, selecting and interactive editing.
Here are some of the operations available in the web view:
Selecting elements
After clicking the arrow cursor button in the SVG tool palette, you can directly select one or more visual elements in the web view.
Use the mouse or trackpad to select visible elements in the web view with point-and-click operations. When an element is selected, some additional controls will be drawn in the web view for editing the selected element.
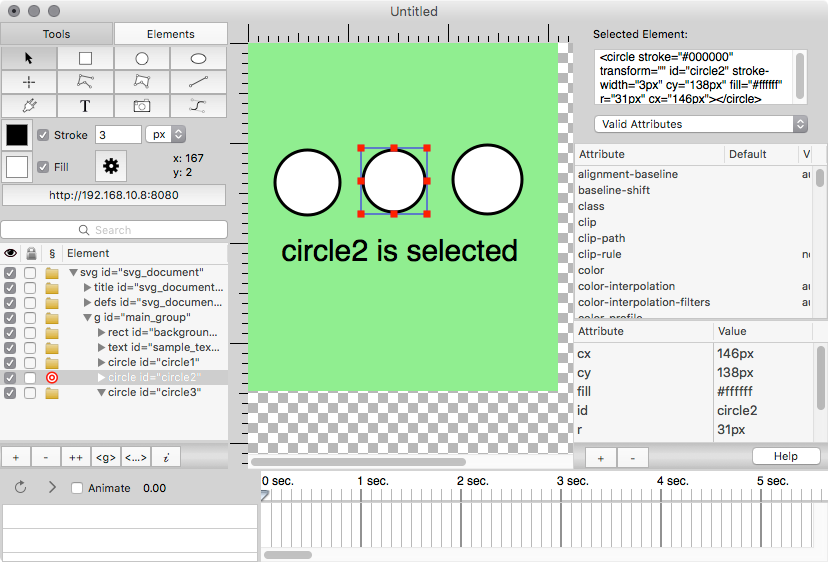
In this screenshot, the arrow cursor tool is selected in the tool palette, and a circle element with the id attribute of “circle2” was selected by clicking on the middle circle in the web view. A blue selection rectangle was drawn around to circle to indicate that it is selected, and eight red square “handles” were drawn to allow the circle to be resized with click-and-drag operations.
Multiple elements can be selected by pressing the Shift key or the Command on the keyboard while clicking. However, only the last selected element will be drawn with controls for resizing.
When an element is selected in the web view, the corresponding item in the SVG document outline view is also selected, and vice-versa.
To deselect an element when multiple elements are selected, use the SVG document outline view. (A future project may add that function to the web view.)
The Edit menu contains the useful Select All (⌘-A) and Select None (⌘-D) commands.
Drawing new elements
These SVG elements can be created by “drawing” directly in the web view:
- <rect>
- <circle>
- <ellipse>
- <polyline>
- <polygon>
- <line>
- <path>
- <text>
- <image>
The SVG tool palette contains a button for creating each of those elements. The details for creating each of those elements is described in the documentation for the SVG tool palette.
Editing existing elements
The web view editing modes are context-sensitive, based on two factors: the current cursor selection in the tool palette, and the selected elements in the web view.
The SVG tool palette contains buttons for three kinds of cursors: the arrow cursor, the crosshair cursor, and the plugin-tools cursor.
The arrow cursor
![]()
The arrow cursor is usable with all visible elements in the web view. When the arrow cursor is active you can select one or more elements. After the elements are selected, you can use click-and-drag operations to relocate the selected elements in the web view.
For the rect, circle, ellipse and image elements, you can also use the arrow cursor to click and drag the red handles on the blue selection rectangles to resize those elements.
The crosshair cursor
The crosshair cursor is available for editing polyline, polygon, line and path elements. The crosshair cursor allows you to edit element at the individual points in those element, and also allows path control points to be edited for path segments like cubic Bezier segments for smooth curves.
The plugin cursor

The plugin cursor is available when the web view mouse operations should be used when certain plug-ins for editing SVG attributes are active.
For example, in order to rotate a rect element, a “transform” attribute can be added to the rect. When the transform attribute is selected for editing, the transform editor plugin panel will be loaded into the macSVG window. While the transform editor is displayed, and the plugin cursor is selected, you can click-and-drag on the red handles to interactively rotate the selected rect element.
The transform editor plugin allows interactive editing in the web view for these operations: translate, scale, rotate, skew x and skew y.
Currently, the transform editor plugin is the only macSVG plugin that uses the plugin cursor, but new plugins could be developed in the future for new interactive editing functions in the web view.
Previous page: SVG Document Outline
Next page: SVG Tools and Elements
Full index: macSVG User Guide